Create your first Configurator
Create a configurator
To create your first Configurator switch to the Configurators Page in the left navigation bar. Create a new configurator by clicking on the Add Configurator- button. You can change the name by hitting the pencil icon next to the configurator name. Click on ⚙-icon or on the name to open the editor.
Add your elements
In the the editor you can add your element by clicking the Add/Update Elements-button in the top of the Elements Panel. Check the box next to your element and hit save. Your created element is now part of this configurator.
Setup your dependencies
In the Default View you can directly setup the basic dependencies to show your element in the widget by following the Quick Start Guide. If you want to manually set those dependencies skip the quick start guide. Now you can see both your tags displayed in EXA3Ds dependency editor. You can arrange these node as you wish by dragging them around. To display an element in the widget we need to set the base of your configuration. The element or elements you can start your configuration with.
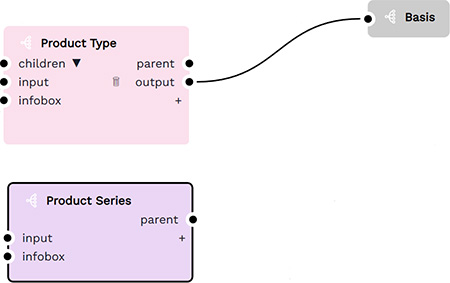
To do so just drag a Basis-node from the lower right menu onto the canvas. Connect the right hand side handle of your secondly created tag with the newly created Basis-node by click and dragging from one handle to the other.
This should look like this then:

When done click on Save on the top right of the page.
🤓 This is the basic configuration setup to display elements in our widget.